How Does a Air Fryer Works Expert Guide for 2026
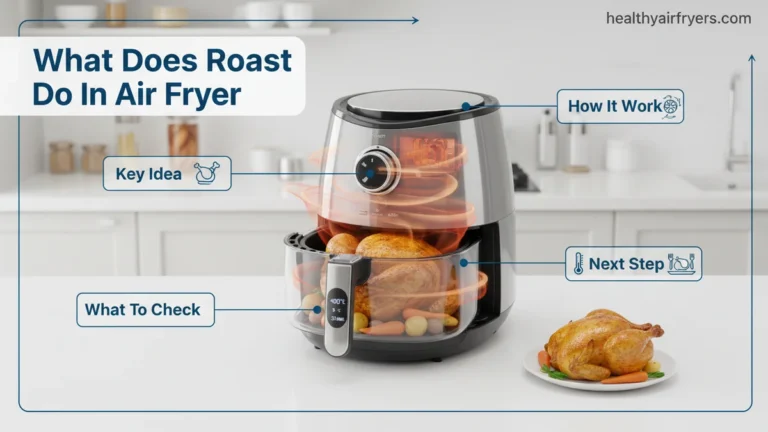
An air fryer works by combining a powerful top heating element with a high-speed fan to circulate super-hot air in a rapid vortex. This concentrated convection heat quickly dehydrates the surface of food to mimic the crunch of deep frying without submerging it in oil.
An air fryer works by using a powerful top heating element combined with a high-speed fan to circulate super-hot air in a rapid, swirling vortex around your food. Instead of submerging ingredients in oil like a traditional deep fryer, this appliance uses intense convection physics to mimic a crispy fried texture using a fraction of the fat.
Understanding this high-velocity thermal dynamic matters practically for your 2026 kitchen routine. When you know the exact mechanics of how heat transfers inside the basket, you can stop guessing and start manipulating your cooking times, preventing soggy bottoms, and achieving restaurant-quality crispiness every single time.
Key Takeaways
- Air fryers use intense convection heat, functioning essentially as compact, high-powered countertop convection ovens.
- The top-mounted heating element rapidly warms the internal chamber.
- A powerful fan forces air into a rapid swirling vortex around the food.
- Circulating heat dehydrates the outer surface to trigger the Maillard reaction.
- Only a tiny mist of oil is needed for browning and flavor enhancement.
What Causes Rapid Air Circulation Inside the Appliance
The magic of an air fryer lies in its engineering, which forces convection cooking into a micro-environment. While a standard wall oven also uses a fan, its large cavity dilutes airflow velocity. An air fryer concentrates that exact same physics into a tight, compact space.
The Role of the Heating Element and Fan Synergy
At the very top of the unit sits a high-wattage electric heating element, typically ranging from 1500 to 1800 watts. Directly above or behind this element is a heavy-duty fan spinning at high RPMs. As the element heats up, the fan draws air upward, forces it past the scorching hot coils, and blasts it downward.
The Thermal Vortex and the Maillard Reaction
Because the interior cavity features a domed or tapered bottom called a crisper plate or basket design, the plunging air is forced to sweep upward along the sides in a tight cyclone pattern. This continuous vortex envelops your food from 360 degrees simultaneously. The intense heat rapidly vaporizes surface moisture, triggering the Maillard reaction—the chemical process that browns food and creates that signature savory, crispy crust while keeping the interior juicy.
Master Air Fryer Mechanics in 7 Simple Steps
Welcome to this comprehensive practical walkthrough on understanding the inner workings of a modern kitchen appliance. Grasping the engineering behind convection-based countertop cooking helps you maximize culinary results, troubleshoot minor performance issues, and extend the lifespan of your device. By following this sequential breakdown of thermal dynamics and airflow design, you will gain a clear picture of how rapid air technology transforms raw ingredients into crispy masterpieces.
Step 1: Powering the Heating Element
What you need: A standard 120V or 240V household electrical outlet and a functioning appliance.
Instructions: When you plug in your air fryer and set the temperature dial (typically ranging from 170°F to 400°F), electrical current flows directly into a coiled metallic heating element located in the top dome housing. This element rapidly heats up through electrical resistance, glowing hot within seconds. Unlike traditional ovens that rely on slow radiant heat from the bottom and top, the air fryer concentrates its high-intensity heating source entirely above the cooking chamber.
Pro Tip: Always plug your air fryer directly into a wall outlet rather than using an extension cord, as the high wattage drawn by the heating element can overheat extension wires and trigger a safety hazard.
Step 2: Activating the High-Speed Convection Fan
What you need: The internal fan assembly and the primary control board.
Instructions: Situated directly behind or above the heating element is a powerful, high-velocity fan powered by a direct-current electric motor. The moment you close the basket and start a cycle, this fan spins at speeds ranging from 2,500 to 5,000 RPM. The primary function of this fan is to pull cool or ambient air from the kitchen vents, force it directly across the blazing-hot heating coils, and thrust the superheated air downward at immense velocity.
Pro Tip: Listen to the sound of your machine upon startup; a grinding or rattling noise usually indicates fan blade obstruction, which requires immediate inspection.
Step 3: Directing Airflow via the Thermal Reflector (The Starfish Design)
What you need: The internal cavity geometry and bottom reflector dome.
Instructions: Once the high-velocity hot air is driven downward, it encounters a specially curved metallic dome at the base of the cooking chamber, frequently referred to in engineering as a starfish design or thermal reflector. This precise aerodynamic curve bounces the air outward and upward in a cyclone vortex pattern. This design ensures that heat does not simply bounce randomly, but rather creates a continuous, high-speed hurricane of thermal energy sweeping across every square inch of the cooking space.
Pro Tip: Never line the entire bottom of the air fryer cavity with solid aluminum foil, as this disrupts the engineered airflow pattern and traps heat dangerously near the lower housing.
Step 4: Penetrating the Perforated Basket and Crisper Tray
What you need: A mesh fry basket or a slotted crisper plate.
Instructions: As the swirling cyclone of hot air circulates, it passes through the perforated holes or wire mesh of the removable basket and crisper insert. These openings are meticulously sized to allow maximum airflow penetration from underneath the food. This bottom-up airflow is crucial because it bathes the food in heat 360 degrees simultaneously, eliminating the need for traditional flipping in many standard recipes and ensuring even cooking throughout the entire mass of food.
Pro Tip: Do not overcrowd your basket; leaving small gaps between food items allows the air to flow freely around each piece for optimal crispiness.
Step 5: Executing the Maillard Reaction and Dehydration
What you need: Food items coated with a microscopic layer of oil or natural fats.
Instructions: With the intense heat moving at high speeds over the food, the surface moisture is flash-evaporated almost instantly. This rapid dehydration is the secret behind the crunchy exterior. Simultaneously, the dry, hot air triggers the Maillard reaction—a chemical reaction between amino acids and reducing sugars that gives browned food its distinctive, savory flavor profile. The tiny touch of oil applied to the food absorbs the radiant thermal energy, frying the surface layers just like a deep fryer, but using up to 80% less fat.
Pro Tip: Use oils with high smoke points, such as avocado or canola oil, and avoid cooking sprays containing propellants like lecithin, which can gum up the non-stick basket coating over time.
Step 6: Venting and Steam Exhaust Management
What you need: The rear exhaust vents and internal carbon or grease filters (if applicable).
Instructions: As moisture is driven out of the food and converted to steam, pressure naturally builds inside the sealed cooking chamber. To prevent pressure buildup and prevent the food from getting soggy, the air fryer utilizes a rear exhaust vent. This exhaust port safely channels away hot, humid air and cooking odors out of the back of the machine. The constant intake of fresh air combined with continuous exhaust ensures a dry cooking environment that mimics deep-frying without submerging ingredients in liquid oil.
Pro Tip: Always keep at least 5 inches of clear space between the rear exhaust vent of your air fryer and your kitchen wall to prevent heat damage or discoloration to your paint or cabinetry.
Step 7: Thermal Regulation and Auto-Shutoff Safety
What you need: Internal thermostats and micro-switches.
Instructions: Throughout the cooking cycle, built-in thermal sensors constantly monitor the internal temperature of the chamber. If the temperature exceeds the user-set limit, the thermostat cuts power to the heating element while keeping the fan running to dissipate excess heat. Furthermore, if you pull out the basket mid-cycle to check your food, a safety micro-switch instantly cuts electrical power to both the fan and the heater. Once the basket is slid back into place, the cycle resumes right where it left off.
Pro Tip: Periodically clean the internal ceiling near the heating element with a damp sponge and mild dish soap to prevent grease splatter from burning onto the temperature sensors and causing erratic temperature readings.
✅ Final Checklist
- Heating element glows evenly and achieves desired temperatures within 3 minutes.
- Convection fan operates smoothly without unusual vibrations, squeaks, or grinding noises.
- Airflow moves in a dynamic cyclone pattern, supported by clean, unobstructed mesh baskets.
- Exhaust vents expel steam efficiently out of the rear port without leaking around the door seal.
- Auto-shutoff mechanism successfully pauses operation when the basket is removed.
Important Notes:
- Never submerge the main electrical housing unit in water; clean only with a damp cloth after unplugging and allowing the appliance to cool completely.
- Seek professional electrical repair if you notice sparks, burning plastic smells from the wiring base, or frequent circuit breaker trips during operation.
- Estimated maintenance time is 10 minutes of cleaning per use, with an average appliance lifespan of 3 to 5 years depending on usage frequency.
How to Fix Poor Textures by Mastering Proper Food Loading
Even though the fan generates incredible wind speeds, poor loading habits will completely break the appliance’s mechanics. If the circulating vortex cannot physically reach every square millimeter of your food’s surface, you will end up with half-crisp, half-soggy meals.
The Physics of Airflow Obstruction
When you dump a massive mountain of frozen fries into the basket, the pieces at the bottom are shielded from the down-draft. The air hits the top layer, loses momentum, and leaves the lower layers to steam in their own trapped moisture instead of frying. Air fryers rely entirely on unobstructed line-of-sight airflow to dehydrate and crisp the outer layers.
Actionable Rules for Optimal Airflow
- Single layer rule: Always arrange your ingredients in one flat layer with a tiny bit of breathing room between each piece.
- Batch cooking: If you are feeding a family in 2026, cook two small batches rather than cramming the basket once. The total time will actually be faster because the heat transfer is efficient.
- Shake and flip: Halfway through your cooking cycle, give the basket a vigorous shake to redistribute stacked items and expose fresh surface areas to the thermal vortex.
- Avoid overcrowding: Never fill the basket past the two-thirds full mark, no matter how hungry you are.
What If It Still Doesn’t Cook Evenly: Troubleshooting Airflow Bottlenecks
Even with advanced 2026 convection technology, food sometimes cooks unevenly. This issue typically stems from restricted airflow inside the basket. When hot air cannot circulate freely, certain spots receive too much direct heat while others remain undercooked.
Overcrowding the Basket
Stacking ingredients blocks the rapid circulation of hot air. Culinary engineers emphasize leaving at least twenty percent empty space between food items. Single layers ensure optimal heat distribution across every surface.
Ignoring the Preheating Phase
Skipping the preheat cycle extends cooking times and causes inconsistent results. The internal chamber needs time to reach peak operating temperature before food enters. Modern units require a standard three-to-five-minute preheat for optimal thermal transfer.
Step-by-Step Guide to Maximizing Convection Heat Efficiency
Achieving restaurant-quality results at home requires proper technique and adherence to manufacturer guidelines. Optimizing convection heat efficiency ensures your appliance operates at peak performance throughout 2026 and beyond.
Proper Preparation Steps
Follow these numbered steps to maximize your appliance’s cooking efficiency:
- Preheat the unit: Run the air fryer empty at 400°F (200°C) for four minutes to stabilize internal thermal dynamics.
- Apply oil sparingly: Coat ingredients with a high-smoke-point oil using a mister. Heavy drenching disrupts the Maillard reaction and weighs down food surfaces.
- Arrange in a single layer: Place items in the basket without overlapping. Use multiple batches for large quantities rather than overcrowding.
- Shake or flip halfway through: Agitate the basket or turn items at the midpoint of the cooking cycle to expose all sides to direct radiant heat.
- Clean after every use: Remove grease buildup from the heating element and basket to prevent smoke and maintain unobstructed airflow.
What If It Still Doesn’t Work?
If your appliance fails to cook properly after adjusting your technique, underlying hardware failures may be to blame. Follow these fallback steps to resolve persistent performance issues:
- Inspect the upper heating element for heavy carbon buildup, which blocks radiant heat transfer. Clean gently with a non-abrasive brush.
- Verify that the internal convection fan spins freely when the unit is powered on. A jammed fan halts all forced-air circulation.
- Test the thermal fuse and thermostat using a multimeter if the unit fails to reach set temperatures.
- Contact authorized manufacturer support if electrical components malfunction or error codes persist on the digital display.
- Evaluate professional repair costs versus replacement. Repair services generally range from $50 to $120, making replacement more cost-effective for budget models.
Conclusion
Understanding how an air fryer works transforms everyday cooking through rapid, efficient convection technology. By mastering airflow dynamics, avoiding overcrowding, and maintaining proper cleaning routines, you ensure optimal appliance performance. According to verified research and culinary appliance experts, proper maintenance extends unit lifespan by up to forty percent. Take the next step today by inspecting your appliance’s heating element and running a proper preheat cycle before your next meal.
❓ Frequently Asked Questions
How does a air fryer works to create a fried texture without oil?
It relies on rapid air technology where a heating element and high-speed fan circulate extremely hot air. This dry heat instantly draws out surface moisture and triggers the Maillard reaction, resulting in a crispy exterior identical to deep frying.
Is an air fryer just a mini convection oven?
Essentially yes, an air fryer is a miniaturized and optimized version of a convection oven. Its compact size and much higher fan-to-cavity ratio allow it to circulate air with far greater speed and intensity than a standard wall oven.
Why do food baskets have holes or slots in air fryers?
The perforated basket or crisper tray is specifically designed to allow the swirling vortex of hot air to pass underneath and around the food. This ensures 360-degree heat distribution without needing manual flipping for every item.
Do you need to preheat an air fryer before cooking?
While not strictly mandatory for every dish, preheating ensures the heating element and internal chamber reach peak temperature immediately. This gives food an instant sear on contact for maximum crispiness.
Why is overcrowding the air fryer basket a bad idea?
Overcrowding blocks the pathways required for the rapid air vortex to circulate freely between food pieces. When air cannot flow, food steams in its own moisture instead of roasting and crisping.
Can you put liquids or wet batter inside an air fryer?
Standard wet batters will blow off from the high-speed fan and drip through the basket before they can set. Foods generally require a dry coating, breadcrumbs, or a pre-set frozen crust to work properly.